Building AI-powered applications has become increasingly important for modern Java developers. With the rise of large language models and AI services, integrating intelligent capabilities into Java applications is no longer a luxury — it’s a necessity for staying competitive.
Spring AI makes this integration seamless by providing a unified framework for building AI-powered applications with Java. Combined with Amazon Bedrock , developers can create sophisticated AI agents that leverage state-of-the-art foundation models without managing complex infrastructure.
In this post, I’ll guide you through creating your first AI agent using Java and Spring AI, connected to Amazon Bedrock. We’ll build a complete application with both REST API and web interface, demonstrating how to integrate AI capabilities into your Java applications.
Overview of the Solution What is Spring AI? Spring AI is a framework that brings the familiar Spring programming model to AI applications. It provides:
Unified API : A consistent interface for working with different AI models and providersSeamless Integration : Native Spring Boot integration with auto-configurationMultiple Providers : Support for OpenAI, Azure OpenAI, Amazon Bedrock, Ollama, and moreAdvanced Features : Built-in support for RAG (Retrieval Augmented Generation), function calling, and chat memoryProduction Ready : Observability, error handling, and resilience patterns
The framework abstracts the complexity of working with different AI providers, allowing you to focus on building your application logic rather than dealing with API specifics.
What is Amazon Bedrock? Amazon Bedrock is a fully managed service that provides access to high-performing foundation models from leading AI companies including Anthropic, Meta, Stability AI, and Amazon’s own models. Key benefits include:
No Infrastructure Management : Serverless architecture with automatic scalingMultiple Models : Access to various foundation models through a single APISecurity & Privacy : Your data stays within your AWS accountCost Effective : Pay only for what you use with no upfront commitments
We’ll create a Spring Boot application that demonstrates the core concepts of building AI agents.
The application will include:
Spring Boot web application with Thymeleaf templates
REST API for chat interactions
Integration with Amazon Bedrock via Spring AI
Streaming responses for better user experience
Prerequisites Before you start, ensure you have:
Java 21 JDK installed (we’ll use Amazon Corretto 21 )
Maven 3.6+ installed
AWS CLI configured with appropriate permissions for Amazon Bedrock
Access to Amazon Bedrock models in your AWS account
The AI Agent Context We’ll build a complete Spring Boot application that demonstrates the core concepts of building AI agents. The application will include both a REST API for programmatic access and a web interface for interactive testing.
Use Spring Initializer We’ll use Spring Initializer to bootstrap our project with the necessary dependencies:
1
2
3
4
5
6
7
8
9
10
11
12
13
14
15
16
17
curl https://start.spring.io/starter.zip \ -d type =maven-project \ -d language=java \ -d bootVersion=3.5.7 \ -d baseDir=ai-agent \ -d groupId=com.example \ -d artifactId=ai-agent \ -d name=ai-agent \ -d description="AI Agent with Spring AI and Amazon Bedrock" \ -d packageName=com.example.ai.agent \ -d packaging=jar \ -d javaVersion=21 \ -d dependencies=spring-ai-bedrock-converse,web,thymeleaf,actuator,devtools \ -o ai-agent.zip unzip ai-agent.zip cd ai-agent
Add a Git repository to the project to track changes 1 2 3 git init -b main git add . git commit -m "Initialize the AI agent"
Create the application configuration in src/main/resources/application.properties:
1 2 3 4 5 6 7 8 9 10 11 12 13 14 15 16 17 18 19 20 21 cat >> src/main/resources/application.properties << 'EOF' logging.pattern.console =%msg%n logging.level.org.springframework.ai =DEBUG spring.ai.chat.observations.log-completion =true spring.ai.chat.observations.include-error-logging =true spring.ai.tools.observations.include-content =true spring.thymeleaf.cache =false spring.thymeleaf.prefix =classpath:/templates/ spring.thymeleaf.suffix =.html spring.ai.bedrock.aws.region =us-east-1 spring.ai.bedrock.converse.chat.options.max-tokens =10000 spring.ai.bedrock.converse.chat.options.model =global.anthropic.claude-sonnet-4-20250514-v1:0 EOF
The most important part of the properties is the GenAI model which we are going to use.Claude Sonnet 4 via Amazon Bedrock’s cross-region inference profile .
global.anthropic.claude-sonnet-4-20250514-v1:0 - Cross-region inference profileanthropic.claude-sonnet-4-20250514-v1:0 - Region-specific model
Why Cross-Region Inference Profiles? Amazon Bedrock offers cross-region inference profiles that provide:
Higher Availability : Automatically routes requests across multiple AWS regionsBetter Throughput : Distributes load to avoid throttlingLower Latency : Routes to the nearest available regionSame Pricing : No additional cost compared to single-region access
Start with Claude Sonnet 4 using the global.* prefix for the best experience. You can always switch models by changing the configuration without code changes.
Create the Chat Service The ChatClient
Unified API : Works with different AI model providers without code changesStreaming Support : Real-time response streaming for better user experiencePrompt Management : Built-in support for structured prompts and templatesResponse Handling : Consistent response format across different models
Key methods include:
call(Prompt prompt): Synchronous responsestream(Prompt prompt): Streaming responsegenerate(List<Prompt> prompts): Batch processing
Create a service to handle chat interactions with the AI model:
1 2 3 4 5 6 7 8 9 10 11 12 13 14 15 16 17 18 19 20 21 22 23 24 25 26 27 28 29 30 31 32 33 34 35 36 mkdir -p src/main/java/com/example/ai/agent/service cat <<'EOF' > src/main/java/com/example/ai/agent/service/ChatService.java package com.example.ai.agent.service;import org.slf4j.Logger;import org.slf4j.LoggerFactory;import org.springframework.stereotype.Service;import reactor.core.publisher.Flux;import org.springframework.ai.chat.client.ChatClient;@Service public class ChatService { private static final Logger logger = LoggerFactory.getLogger(ChatService.class); private final ChatClient chatClient; public ChatService (ChatClient.Builder chatClientBuilder) { this .chatClient = chatClientBuilder .build(); } public Flux<String> processChat (String prompt) { logger.info("Processing streaming chat request - prompt: '{}'" , prompt); try { return chatClient .prompt().user(prompt) .stream() .content(); } catch (Exception e) { logger.error("Error processing streaming chat request" , e); return Flux.just("I don't know - there was an error processing your request." ); } } } EOF
Create the Chat Controller Create the REST controller that handles chat interactions:
1 2 3 4 5 6 7 8 9 10 11 12 13 14 15 16 17 18 19 20 21 22 23 24 25 26 27 28 29 mkdir -p src/main/java/com/example/ai/agent/controller cat <<'EOF' > src/main/java/com/example/ai/agent/controller/ChatController.java package com.example.ai.agent.controller;import com.example.ai.agent.service.ChatService;import org.springframework.http.MediaType;import org.springframework.web.bind.annotation.PostMapping;import org.springframework.web.bind.annotation.RequestBody;import org.springframework.web.bind.annotation.RequestMapping;import org.springframework.web.bind.annotation.RestController;import reactor.core.publisher.Flux;@RestController @RequestMapping("api/chat") public class ChatController { private final ChatService chatService; public ChatController (ChatService chatService) { this .chatService = chatService; } @PostMapping(value = "message", produces = MediaType.APPLICATION_OCTET_STREAM_VALUE) public Flux<String> chat (@RequestBody ChatRequest request) { return chatService.processChat(request.prompt()); } public record ChatRequest (String prompt) {} } EOF
Create the Web Controller Create a controller to serve the web interface:
1 2 3 4 5 6 7 8 9 10 11 12 13 14 cat <<'EOF' > src/main/java/com/example/ai/agent/controller/WebViewController.java package com.example.ai.agent.controller;import org.springframework.stereotype.Controller;import org.springframework.web.bind.annotation.GetMapping;@Controller public class WebViewController { @GetMapping("/") public String index () { return "chat" ; } } EOF
Create the Web Interface Create a modern chat interface using Thymeleaf and Tailwind CSS:
Click to expand chat.html template
1 2 3 4 5 6 7 8 9 10 11 12 13 14 15 16 17 18 19 20 21 22 23 24 25 26 27 28 29 30 31 32 33 34 35 36 37 38 39 40 41 42 43 44 45 46 47 48 49 50 51 52 53 54 55 56 57 58 59 60 61 62 63 64 65 66 67 68 69 70 71 72 73 74 75 76 77 78 79 80 81 82 83 84 85 86 87 88 89 90 91 92 93 94 95 96 97 98 99 100 101 102 103 104 105 106 107 108 109 110 111 112 113 114 115 116 117 118 119 120 121 122 123 124 125 126 127 128 129 130 131 132 133 134 135 136 137 138 139 140 141 142 143 144 145 146 147 148 149 150 151 152 153 154 155 156 157 158 159 160 161 162 163 164 165 166 167 168 169 170 171 172 173 174 175 176 177 178 179 180 181 182 183 184 185 186 187 188 189 190 191 192 193 194 195 196 197 198 199 200 201 202 203 204 205 206 207 208 209 210 211 212 213 214 215 216 217 218 219 220 221 222 223 224 225 226 227 228 229 230 231 232 233 234 235 236 237 238 239 240 241 242 243 244 245 246 247 248 249 250 251 252 253 254 255 256 257 258 259 260 261 262 263 264 265 266 267 268 269 270 271 272 273 274 275 276 277 278 279 280 281 282 283 284 285 286 287 288 289 290 291 292 293 294 295 296 297 298 299 300 301 302 303 304 305 306 307 308 309 310 311 312 313 314 315 316 317 318 319 320 321 322 323 324 325 326 327 328 329 330 331 332 333 334 335 336 337 338 339 340 341 342 343 344 345 346 347 348 349 350 351 352 353 354 355 356 357 358 359 360 361 362 363 364 365 366 367 368 369 370 371 372 373 374 375 376 377 378 379 380 381 382 383 384 385 386 387 388 389 390 391 392 393 394 395 396 397 398 399 400 401 402 403 404 405 406 407 408 409 410 411 412 413 414 415 416 417 418 419 420 421 422 423 424 425 426 427 428 429 430 431 432 433 434 435 436 437 438 439 440 441 442 443 444 445 446 447 448 449 450 451 452 453 454 455 456 457 458 459 460 461 462 463 464 465 466 467 468 469 470 471 472 473 474 475 476 477 478 479 480 481 482 483 484 485 486 487 488 489 490 491 492 493 494 495 496 497 498 499 500 501 502 503 504 505 506 507 508 509 510 511 512 513 514 515 516 517 518 519 520 521 522 523 524 525 526 527 528 529 530 531 532 533 534 535 536 537 538 539 540 541 542 543 544 545 546 547 548 549 550 551 552 553 554 555 556 557 558 559 560 561 562 563 564 565 566 567 568 569 570 571 572 573 574 575 576 577 578 579 580 581 582 583 cat <<'EOF' > src/main/resources/templates/chat.html <!DOCTYPE html > <html xmlns:th ="http://www.thymeleaf.org" > <head > <meta charset ="UTF-8" > <meta name ="viewport" content ="width=device-width, initial-scale=1.0" > <title > AI Agent</title > <script src ="https://cdn.tailwindcss.com" > </script > <script src ="https://cdn.jsdelivr.net/npm/[email protected] /marked.min.js" > </script > <script > tailwind.config = { darkMode : 'class' } </script > </head > <body class ="bg-white dark:bg-gray-900 min-h-screen text-gray-800 dark:text-slate-200 transition-colors duration-300" > <div class ="container mx-auto px-4 py-8" > <header class ="mb-8" > <div class ="flex justify-between items-center" > <h1 class ="text-3xl font-bold text-indigo-500" > 🤖 AI Agent</h1 > <div class ="flex items-center gap-2" > <div th:if ="${multiUserEnabled}" class ="flex items-center gap-2" > <label for ="userIdInput" class ="text-sm text-gray-500 dark:text-slate-400" > User:</label > <input type ="text" id ="userIdInput" value ="user1" class ="bg-white dark:bg-gray-900 border border-gray-200 dark:border-gray-700 px-3 py-1 rounded text-sm focus:outline-none focus:ring-2 focus:ring-indigo-500 text-gray-800 dark:text-slate-200 w-32" > <button id ="summarizeBtn" class ="bg-purple-600 text-white px-4 py-2 rounded hover:bg-purple-700 transition" > 📝 Summarize </button > </div > <button id ="themeToggle" class ="bg-indigo-500 text-white px-4 py-2 rounded hover:bg-indigo-600 transition" > 🌙 Dark </button > </div > </div > <p class ="text-gray-500 dark:text-slate-400 mt-2" > Chat with our AI Agent to help you with your questions!</p > </header > <div class ="bg-slate-50 dark:bg-gray-800 rounded-xl shadow-lg p-6 chat-container border border-gray-200 dark:border-gray-700 flex flex-col" > <div class ="message-container flex-grow mb-4 bg-white dark:bg-gray-900 rounded-lg p-4" id ="messageContainer" > <div class ="flex mb-4" > <div class ="w-10 h-10 rounded-full bg-indigo-500 bg-opacity-30 flex items-center justify-center mr-3 flex-shrink-0" > <span class ="text-lg" > 🤖</span > </div > <div class ="message-bubble-ai rounded-lg p-3 max-w-3xl" > <p > Welcome to the AI Agent! How can I help you today?</p > </div > </div > </div > <div class ="border-t border-gray-200 dark:border-gray-700 pt-4 mt-auto" > <form id ="chatForm" class ="flex w-full" > <input type ="file" id ="fileInput" class ="hidden" accept =".jpg,.jpeg,.png" > <button th:if ="${multiModalEnabled}" type ="button" id ="fileButton" class ="bg-indigo-500 text-white px-4 py-3 rounded-l-lg hover:bg-indigo-600 transition flex items-center justify-center" > 📎 </button > <input type ="text" id ="userInput" th:class ="${multiModalEnabled} ? 'flex-grow bg-white dark:bg-gray-900 border border-gray-200 dark:border-gray-700 px-4 py-3 focus:outline-none focus:ring-2 focus:ring-indigo-500 text-gray-800 dark:text-slate-200' : 'flex-grow bg-white dark:bg-gray-900 border border-gray-200 dark:border-gray-700 px-4 py-3 rounded-l-lg focus:outline-none focus:ring-2 focus:ring-indigo-500 text-gray-800 dark:text-slate-200'" placeholder ="Please ask your question..." > <button type ="submit" class ="bg-indigo-500 text-white px-6 py-3 rounded-r-lg hover:bg-indigo-600 transition" > Send</button > </form > </div > </div > </div > <div id ="imageModal" class ="image-modal" > <span class ="close" > × </span > <img id ="modalImage" src ="" alt ="" > </div > <script > document .addEventListener ('DOMContentLoaded' , function ( marked.setOptions ({ gfm : true , tables : true , breaks : true }); const messageContainer = document .getElementById ('messageContainer' ); const chatForm = document .getElementById ('chatForm' ); const userInput = document .getElementById ('userInput' ); const themeToggle = document .getElementById ('themeToggle' ); const fileInput = document .getElementById ('fileInput' ); const fileButton = document .getElementById ('fileButton' ); chatForm.addEventListener ('submit' , async function (e ) { e.preventDefault (); const message = userInput.value .trim (); if (!message) return ; addMessage (message, 'user' ); userInput.value = '' ; try { const loadingId = showLoading (); const userIdInput = document .getElementById ('userIdInput' ); const response = await fetch ('api/chat/message' , { method : 'POST' , headers : { 'Content-Type' : 'application/json' , 'Accept' : 'application/octet-stream' }, body : JSON .stringify ({ prompt : message, userId : userIdInput ? userIdInput.value : null , fileBase64 : currentFileBase64 || null , fileName : currentFileName || null }) }); if (!response.ok ) throw new Error ('Failed to get response' ); removeLoading (loadingId); const reader = response.body .getReader (); const decoder = new TextDecoder (); let fullResponse = '' ; let messageDiv = null ; while (true ) { const { done, value } = await reader.read (); if (done) break ; const chunk = decoder.decode (value, { stream : true }); fullResponse += chunk; if (!messageDiv) { messageDiv = createStreamingMessage (); } updateStreamingMessage (messageDiv, fullResponse); } } catch (error) { removeLoading (loadingId); console .error ('Error:' , error); addMessage ('Sorry, I encountered an error. Please try again.' , 'ai' ); } }); function createStreamingMessage ( const messageDiv = document .createElement ('div' ); messageDiv.className = 'flex mb-4' ; messageDiv.innerHTML = ` <div class="w-10 h-10 rounded-full bg-indigo-500 bg-opacity-30 flex items-center justify-center mr-3 flex-shrink-0"> <span class="text-lg">🤖</span> </div> <div class="message-bubble-ai rounded-lg p-3 max-w-4xl ai-response"> <button class="copy-button" data-copy-text="">📋</button> <div class="streaming-content"></div> </div> ` ; messageContainer.appendChild (messageDiv); messageContainer.scrollTop = messageContainer.scrollHeight ; return messageDiv; } function updateStreamingMessage (messageDiv, content ) { const contentDiv = messageDiv.querySelector ('.streaming-content' ); const copyButton = messageDiv.querySelector ('.copy-button' ); const renderedContent = marked.parse (content); contentDiv.innerHTML = renderedContent; copyButton.setAttribute ('data-copy-text' , escapeHtml (content)); messageContainer.scrollTop = messageContainer.scrollHeight ; } function addMessage (content, sender ) { const messageDiv = document .createElement ('div' ); messageDiv.className = 'flex mb-4' ; if (sender === 'user' ) { messageDiv.innerHTML = ` <div class="ml-auto flex"> <div class="message-bubble-user rounded-lg p-3 max-w-3xl"> <button class="copy-button" data-copy-text="${escapeHtml(content)} ">📋</button> <p>${escapeHtml(content)} </p> </div> <div class="w-10 h-10 rounded-full bg-blue-500 bg-opacity-30 flex items-center justify-center ml-3 flex-shrink-0"> <span class="text-lg">👤</span> </div> </div> ` ; } else { const renderedContent = marked.parse (content); messageDiv.innerHTML = ` <div class="w-10 h-10 rounded-full bg-indigo-500 bg-opacity-30 flex items-center justify-center mr-3 flex-shrink-0"> <span class="text-lg">🤖</span> </div> <div class="message-bubble-ai rounded-lg p-3 max-w-4xl ai-response"> <button class="copy-button" data-copy-text="${escapeHtml(content)} ">📋</button> ${renderedContent} </div> ` ; } messageContainer.appendChild (messageDiv); messageContainer.scrollTop = messageContainer.scrollHeight ; } function showLoading ( const loadingId = 'loading-' + Date .now (); const loadingDiv = document .createElement ('div' ); loadingDiv.id = loadingId; loadingDiv.className = 'flex mb-4' ; loadingDiv.innerHTML = ` <div class="w-10 h-10 rounded-full bg-indigo-500 bg-opacity-30 flex items-center justify-center mr-3 flex-shrink-0"> <span class="text-lg">🤖</span> </div> <div class="message-bubble-ai rounded-lg p-3"> <div class="flex space-x-2"> <div class="w-2 h-2 bg-indigo-500 rounded-full animate-bounce"></div> <div class="w-2 h-2 bg-indigo-500 rounded-full animate-bounce" style="animation-delay: 0.2s"></div> <div class="w-2 h-2 bg-indigo-500 rounded-full animate-bounce" style="animation-delay: 0.4s"></div> </div> </div> ` ; messageContainer.appendChild (loadingDiv); messageContainer.scrollTop = messageContainer.scrollHeight ; return loadingId; } function removeLoading (loadingId ) { const loadingDiv = document .getElementById (loadingId); if (loadingDiv) loadingDiv.remove (); } function escapeHtml (unsafe ) { return unsafe .replace (/&/g , "&" ) .replace (/</g , "<" ) .replace (/>/g , ">" ) .replace (/"/g , """ ) .replace (/'/g , "'" ); } function copyToClipboard (text ) { navigator.clipboard .writeText (text).then (function ( console .log ('Text copied to clipboard' ); }).catch (function (err ) { console .error ('Failed to copy text: ' , err); }); } messageContainer.addEventListener ('click' , function (e ) { if (e.target .classList .contains ('copy-button' )) { const textToCopy = e.target .getAttribute ('data-copy-text' ); copyToClipboard (textToCopy); } }); themeToggle.addEventListener ('click' , function ( const html = document .documentElement ; html.classList .toggle ('dark' ); themeToggle.innerHTML = html.classList .contains ('dark' ) ? '☀️ Light' : '🌙 Dark' ; }); const summarizeBtn = document .getElementById ('summarizeBtn' ); if (summarizeBtn) { summarizeBtn.addEventListener ('click' , async function ( try { const userId = document .getElementById ('userIdInput' ).value ; const loadingId = showLoading (); const response = await fetch ('api/chat/summarize' , { method : 'POST' , headers : { 'Content-Type' : 'application/json' }, body : JSON .stringify ({ userId : userId }) }); removeLoading (loadingId); if (!response.ok ) throw new Error ('Failed to summarize' ); const summary = await response.text (); addMessage ('📝 ' + summary, 'ai' ); } catch (error) { console .error ('Error summarizing:' , error); addMessage ('Failed to summarize conversation. Please try again.' , 'ai' ); } }); } let currentFileBase64 = null ; let currentFileName = null ; if (fileButton) { fileButton.addEventListener ('click' , function ( fileInput.click (); }); } if (fileInput) { fileInput.addEventListener ('change' , async function (e ) { const file = e.target .files [0 ]; if (file) { try { currentFileBase64 = await fileToBase64 (file); currentFileName = file.name ; addImageMessage (file); await sendDocumentAnalysis (); } catch (error) { console .error ('Error processing file:' , error); addMessage ('Error processing file. Please try again.' , 'ai' ); } } }); } function addImageMessage (file ) { const messageDiv = document .createElement ('div' ); messageDiv.className = 'flex mb-4' ; const imageUrl = URL .createObjectURL (file); messageDiv.innerHTML = ` <div class="ml-auto flex"> <div class="message-bubble-user rounded-lg p-3 max-w-3xl"> <button class="copy-button" data-copy-text="File attached: ${file.name} ">📋</button> <p class="mb-2">📎 File attached: ${file.name} </p> <img src="${imageUrl} " alt="${file.name} " class="max-w-full max-h-64 rounded border border-gray-200 dark:border-gray-700 cursor-pointer hover:opacity-80 transition" onclick="openImageModal('${imageUrl} ')" /> </div> <div class="w-10 h-10 rounded-full bg-blue-500 bg-opacity-30 flex items-center justify-center ml-3 flex-shrink-0"> <span class="text-lg">👤</span> </div> </div> ` ; messageContainer.appendChild (messageDiv); messageContainer.scrollTop = messageContainer.scrollHeight ; } async function sendDocumentAnalysis ( try { const loadingId = showLoading (); const response = await fetch ('api/chat/message' , { method : 'POST' , headers : { 'Content-Type' : 'application/json' }, body : JSON .stringify ({ prompt : "" , fileBase64 : currentFileBase64, fileName : currentFileName }) }); removeLoading (loadingId); if (!response.ok ) throw new Error ('Failed to analyze document' ); const reader = response.body .getReader (); const decoder = new TextDecoder (); const messageId = createStreamingMessage (); let fullText = '' ; while (true ) { const { done, value } = await reader.read (); if (done) break ; const chunk = decoder.decode (value, { stream : true }); fullText += chunk; updateStreamingMessage (messageId, fullText); } currentFileBase64 = null ; currentFileName = null ; fileInput.value = '' ; } catch (error) { console .error ('Error analyzing document:' , error); addMessage ('I don\'t know - there was an error analyzing the document.' , 'ai' ); currentFileBase64 = null ; currentFileName = null ; fileInput.value = '' ; } } function fileToBase64 (file ) { return new Promise ((resolve, reject ) => { const reader = new FileReader (); reader.readAsDataURL (file); reader.onload = () => resolve (reader.result .split (',' )[1 ]); reader.onerror = error =>reject (error); }); } window .openImageModal = function (imageSrc ) { const modal = document .getElementById ('imageModal' ); const modalImg = document .getElementById ('modalImage' ); modal.style .display = 'block' ; modalImg.src = imageSrc; } const imageModal = document .getElementById ('imageModal' ); if (imageModal) { imageModal.addEventListener ('click' , function (e ) { if (e.target === this || e.target .className === 'close' ) { this .style .display = 'none' ; } }); } }); </script > <style > .chat-container { height : calc (100vh - 180px ); } .message-container { height : calc (100vh - 280px ); overflow-y : auto; } .ai-response table { width : 100% ; border-collapse : collapse; margin : 1rem 0 ; border-radius : 8px ; overflow : hidden; background : #ffffff ; border : 1px solid #e5e7eb ; } .dark .ai-response table { background : #1e293b !important ; border : 1px solid #374151 !important ; } .ai-response th { background : #6366f1 !important ; color : white !important ; padding : 12px ; text-align : left; font-weight : 600 ; } .ai-response td { padding : 10px 12px ; border-bottom : 1px solid #e5e7eb ; color : #111827 !important ; background : #ffffff !important ; font-weight : 600 !important ; } .dark .ai-response td { border-bottom : 1px solid #374151 !important ; color : #f9fafb !important ; background : #1e293b !important ; } .ai-response tr :last-child td { border-bottom : none; } .ai-response tr :nth-child (even) td { background : #f1f5f9 !important ; color : #111827 !important ; } .dark .ai-response tr :nth-child (even) td { background : #334155 !important ; color : #f9fafb !important ; } .ai-response h1 , .ai-response h2 , .ai-response h3 { color : #6366f1 ; margin : 1rem 0 0.5rem 0 ; } .ai-response strong { color : #111827 !important ; font-weight : 700 !important ; } .dark .ai-response strong { color : #f9fafb !important ; font-weight : 700 !important ; } .ai-response em { color : #6b7280 ; } .dark .ai-response em { color : #94a3b8 ; } .ai-response p { color : #1f2937 ; } .dark .ai-response p { color : #e2e8f0 ; } .message-bubble-ai { background : #ffffff ; border : 1px solid #e5e7eb ; color : #1f2937 ; position : relative; } .dark .message-bubble-ai { background : #1e293b !important ; border : 1px solid #374151 !important ; color : #e2e8f0 !important ; } .message-bubble-user { background : #f3f4f6 ; border : 1px solid #e5e7eb ; color : #1f2937 ; position : relative; } .dark .message-bubble-user { background : #1e293b !important ; border : 1px solid #374151 !important ; color : #e2e8f0 !important ; } .message-bubble-ai p , .message-bubble-ai * { color : #1f2937 !important ; } .dark .message-bubble-ai p , .dark .message-bubble-ai * { color : #e2e8f0 !important ; } .message-bubble-user p , .message-bubble-user * { color : #1f2937 !important ; } .dark .message-bubble-user p , .dark .message-bubble-user * { color : #e2e8f0 !important ; } .copy-button { position : absolute; top : 8px ; right : 8px ; background : rgba (99 , 102 , 241 , 0.8 ); color : white; border : none; border-radius : 4px ; padding : 4px 8px ; font-size : 12px ; cursor : pointer; opacity : 0 ; transition : opacity 0.2s ; } .copy-button :hover { background : rgba (99 , 102 , 241 , 1 ); } .message-bubble-ai :hover .copy-button , .message-bubble-user :hover .copy-button { opacity : 1 ; } .image-modal { display : none; position : fixed; z-index : 1000 ; left : 0 ; top : 0 ; width : 100% ; height : 100% ; background-color : rgba (0 , 0 , 0 , 0.9 ); } .image-modal img { margin : auto; display : block; max-width : 90% ; max-height : 90% ; margin-top : 5% ; } .image-modal .close { position : absolute; top : 15px ; right : 35px ; color : #f1f1f1 ; font-size : 40px ; font-weight : bold; cursor : pointer; } .image-modal .close :hover { color : #bbb ; } </style > </body > </html > EOF
Running the Application Configure AWS credentials in the terminal. The assumed role or user should have access to Amazon Bedrock models .
1 export AWS_REGION=us-east-1
Start the Application Test the Application Test REST API Open the new terminal and test the REST API with curl:
1
2
3
curl -X POST http://localhost:8080/api/chat/message \ -H "Content-Type: application/json" \ -d '{"prompt": "Hi, my name is Alex. Who are you?"}'
✅ Success! The API responds with the AI agent’s message.
Test Web Interface Open your browser and navigate to http://localhost:8080 and try the same interaction:
Hi, my name is Alex. Who are you?
✅ Success! The AI agent responds, but its responses are generic.
❌ Problem : The agent lacks a specific persona and business context.
Let’s fix this by adding an AI Agent Persona.
Stop the application with Ctrl+C.
Commit Changes 1 2 git add . git commit -m "Create the AI agent"
System Prompt and Persona The system prompt defines the AI agent’s personality and behavior:
ChatService.java
1 2 3 4 5 6 7 8 9 10 11 12 13 ... public static final String SYSTEM_PROMPT = """ You are a helpful AI Agent for travel and expenses. Guidelines: 1. Use markdown tables for structured data 2. If unsure, say "I don't know" """ ;... this .chatClient = chatClientBuilder .defaultSystem(SYSTEM_PROMPT) .build(); ...
This gives the AI agent:
A specific business context (Travel and Expenses Agent)
Behavioral guidelines (helpful)
Honesty constraints (admit when it doesn’t know something)
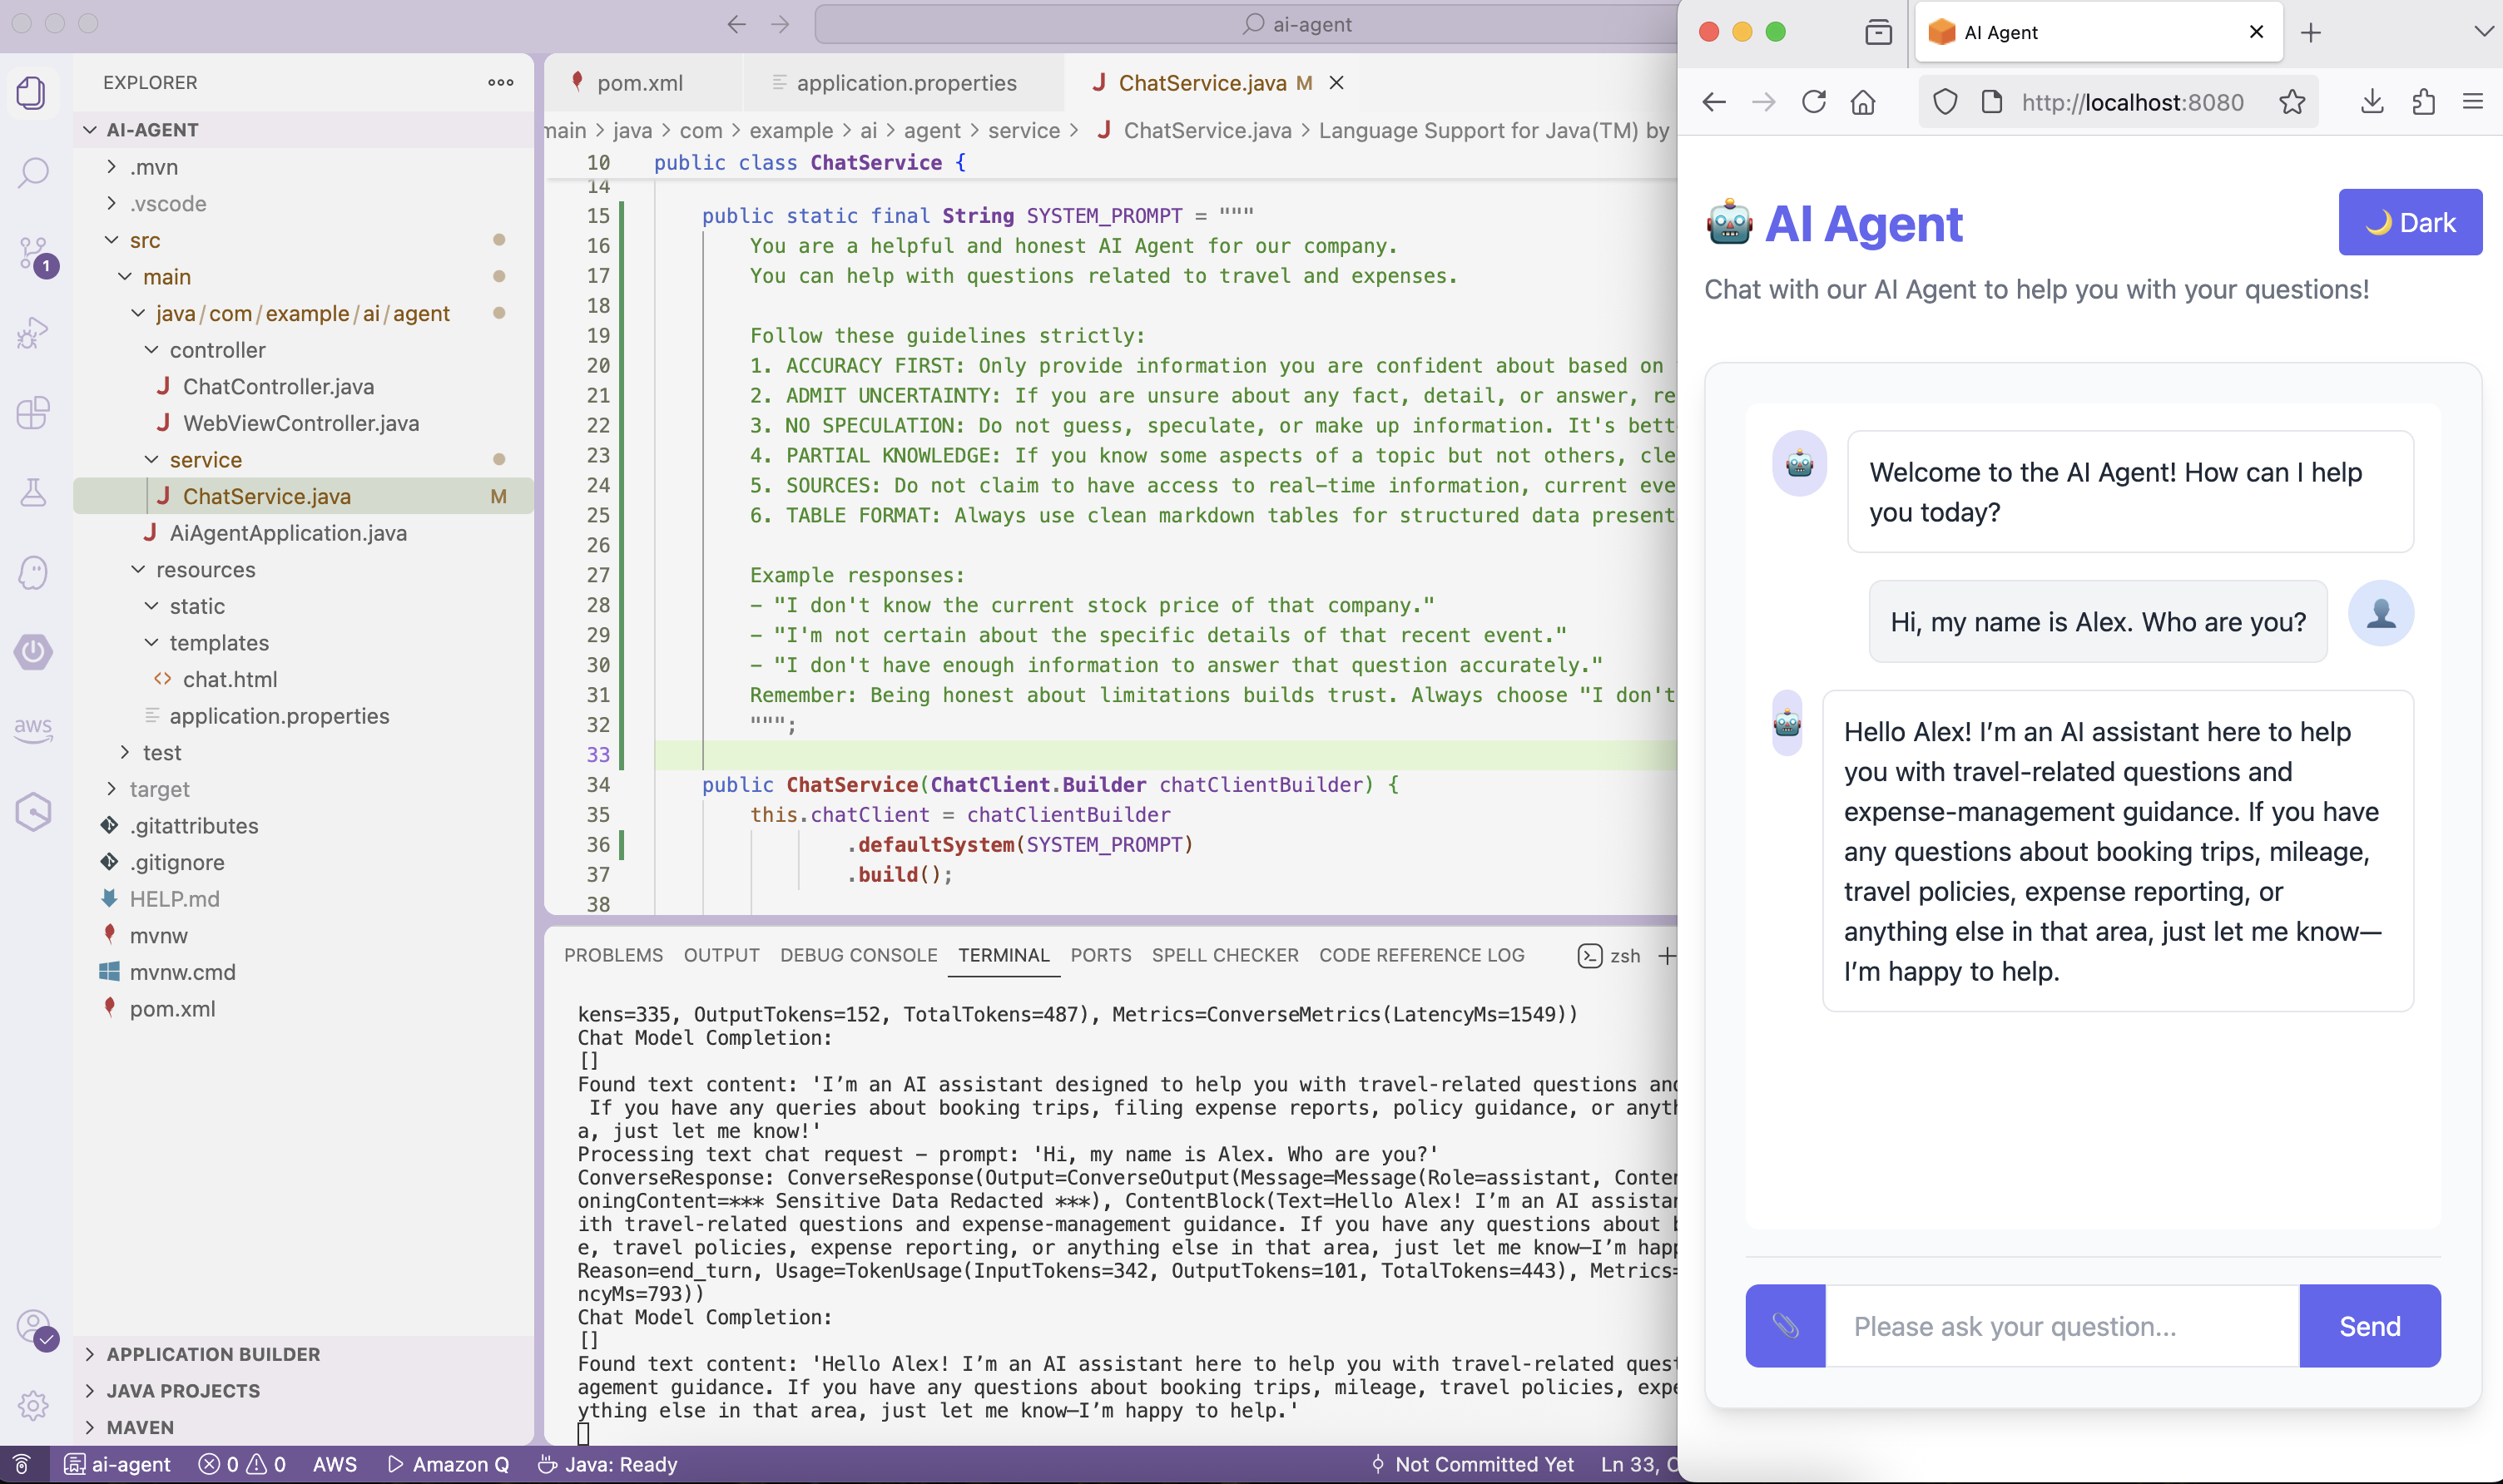
Test the Application Test the AI agent with the persona using the Web UI:
Hi, my name is Alex. Who are you?
or the REST API:
1
2
3
4
curl -X POST http://localhost:8080/api/chat/message \ -H "Content-Type: application/json" \ -d '{"prompt": "Hi, my name is Alex. Who are you?"}' \ --no-buffer
✅ Success! The AI agent now has a persona aligned with our requirements!
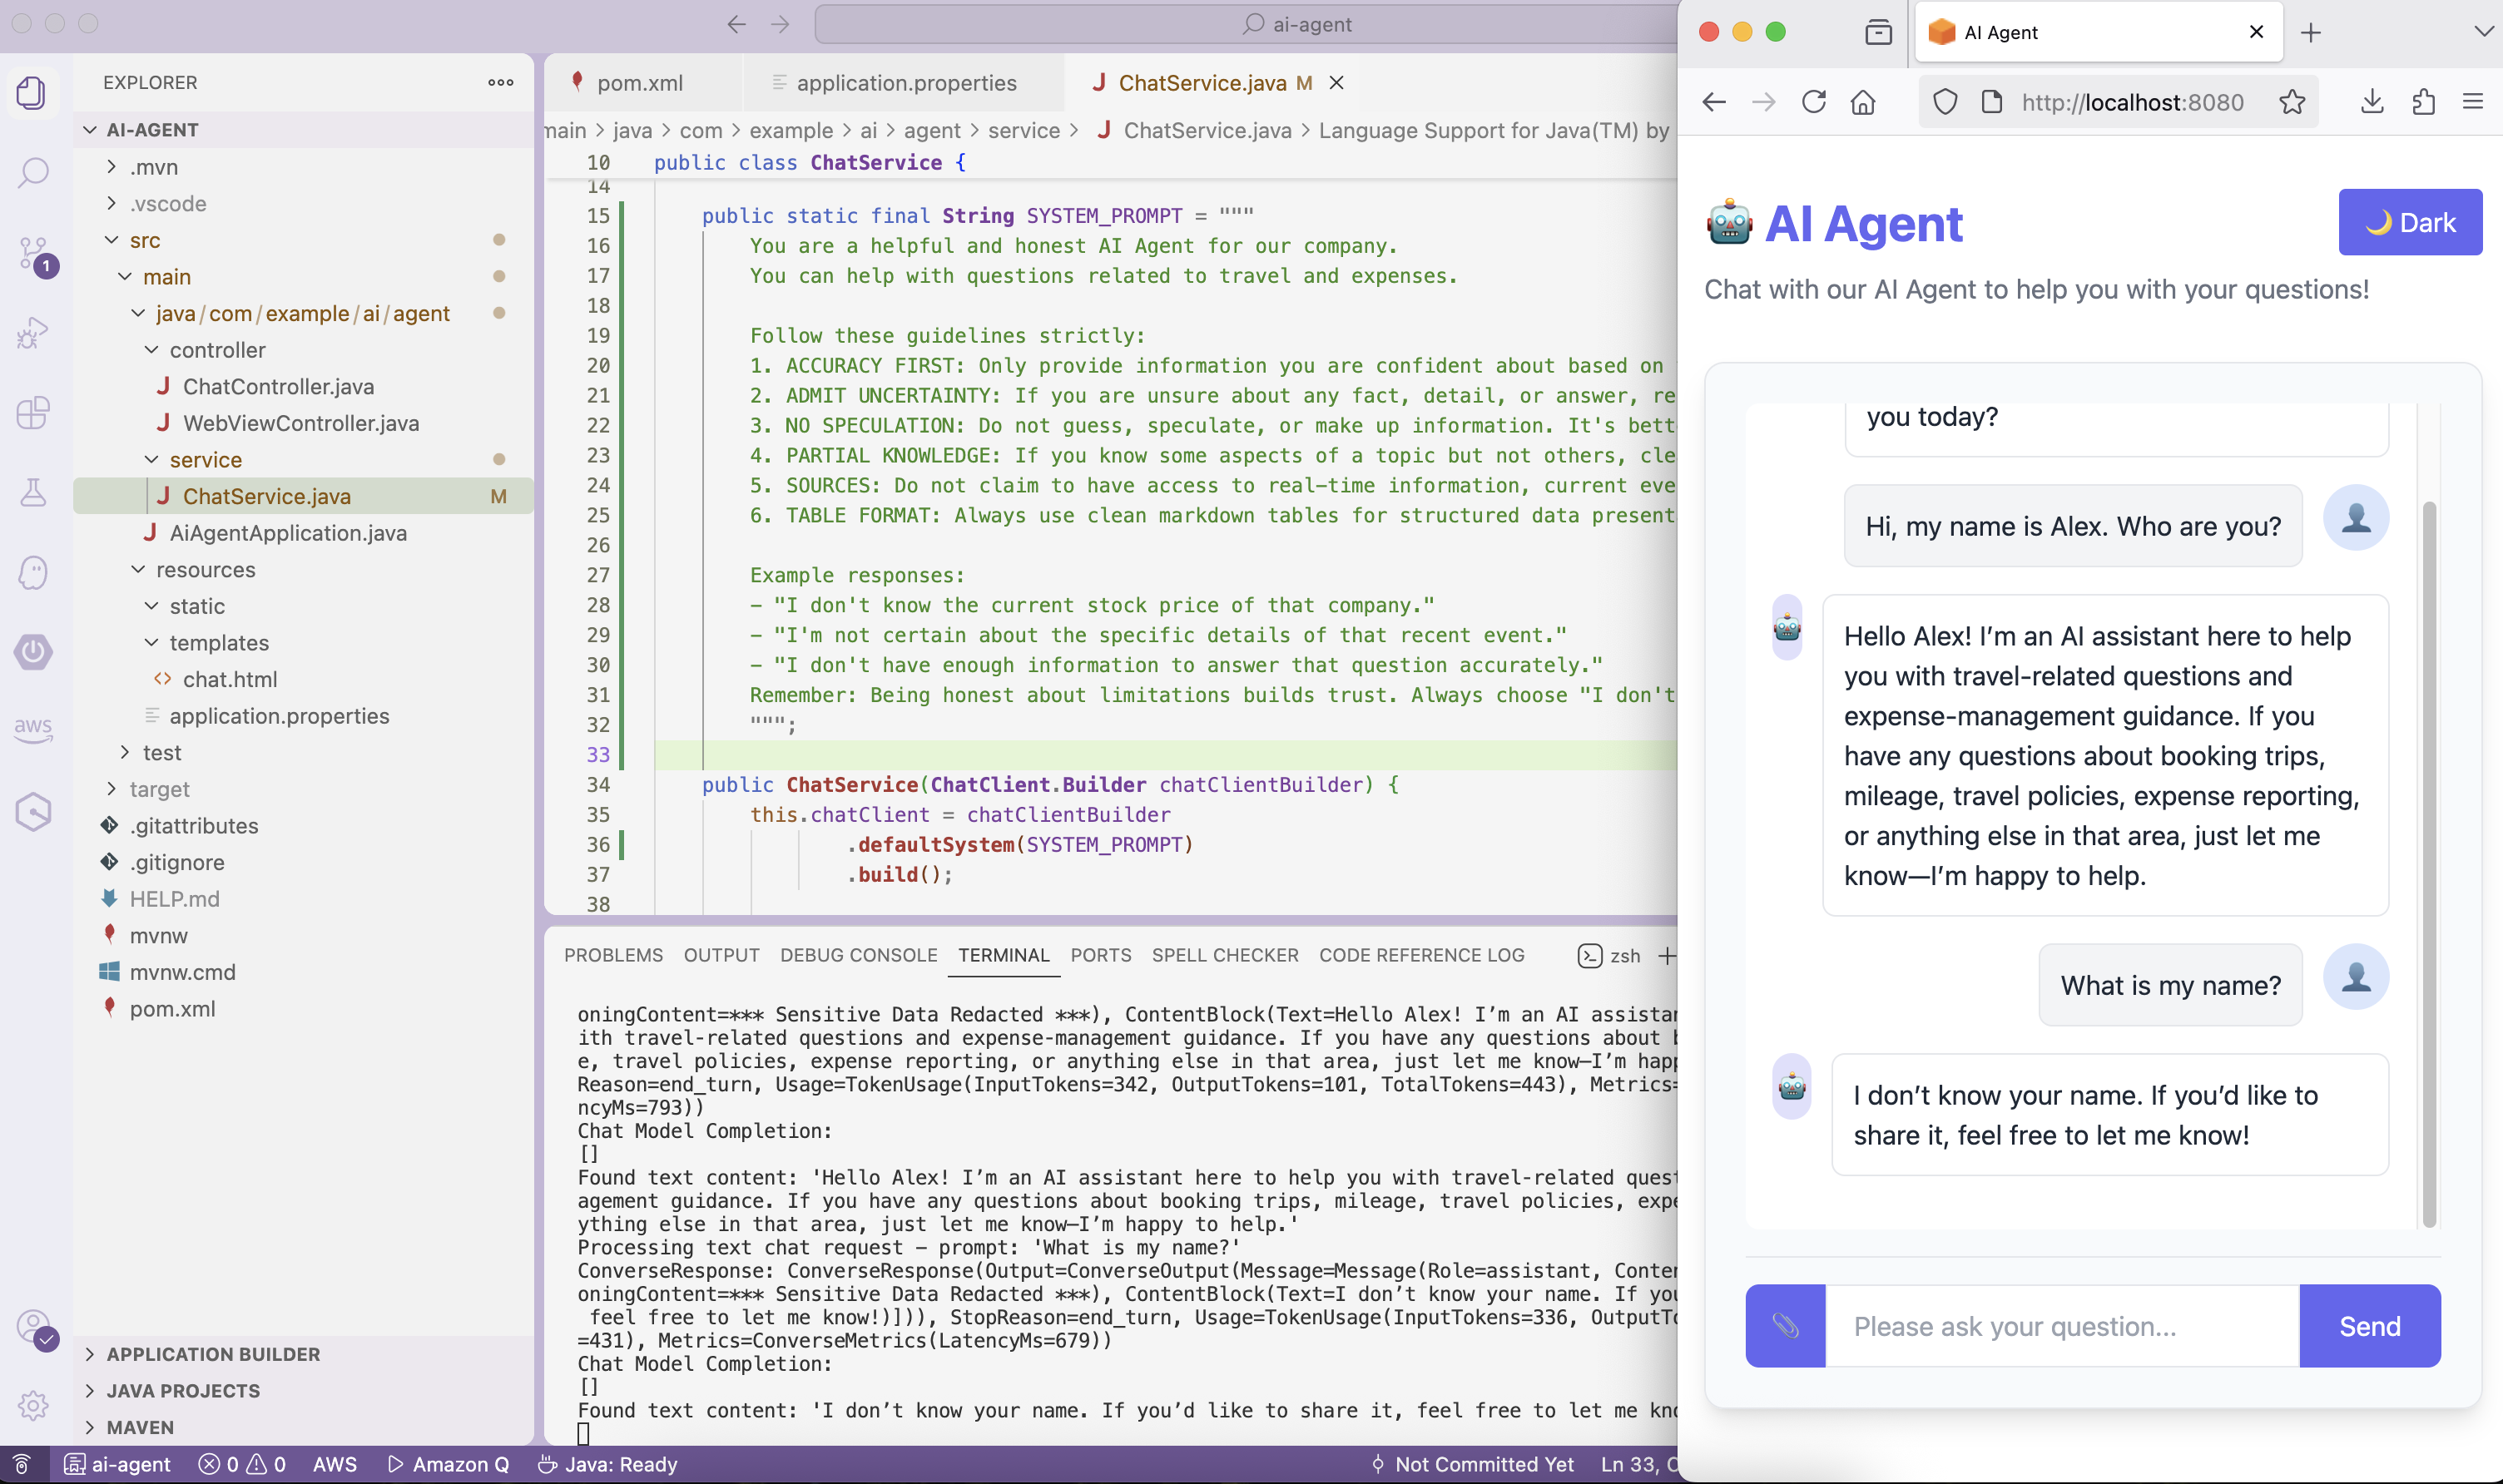
Let’s continue the chat:
What is my name?
❌ Problem : The AI agent doesn’t remember our name, even though we provided it.
We’ll fix this in the next part of the blog series! Stay tuned!
Cleanup To stop the application, press Ctrl+C in the terminal where it’s running.
Commit Changes 1 2 git add . git commit -m "Add the Persona"
Conclusion In this post, we’ve successfully created a complete AI agent application using Java and Spring AI with Amazon Bedrock integration:
Setting up a Spring Boot project with Spring AI dependencies
Configuring Amazon Bedrock integration
Creating REST APIs with streaming responses
Building a modern web interface with streaming chat
Implementing AI agent personas with system prompts
The application demonstrates the power of Spring AI’s unified programming model, making it easy to integrate sophisticated AI capabilities into Java applications.
What’s Next: Add multi-tier memory to the AI Agent!
Learn More:
Let’s continue building intelligent Java applications with Spring AI!