Amazon Elastic Kubernetes Service (EKS) is a fully managed Kubernetes service that enables you to run Kubernetes seamlessly in both AWS Cloud and on-premises data centers. Just a few days before AWS re:Invent 2024, a new, exciting feature was released - Amazon EKS Auto Mode. This feature gives you a possibility to have a fully functional EKS cluster in a matter of minutes, with all necessary components included. There are several methods of deploying an EKS cluster. You can find some of them in the documentation or in the launch blog, but today I will use another one - deploying with AWS Cloud Development Kit (CDK) in Java. You can use a similar approach if you use other programming languages with AWS CDK.
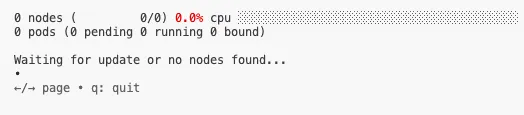
(Optional) Install eks-node-viewer to visualize EKS cluster nodes
Walkthrough
Creating a Java CDK application
Use the instructions below or documentation and create the CDK application:
1
2
3
4
5
6
7
8
9
# create a folder for a CDK application
mkdir eks-auto-mode && cd eks-auto-mode
# set the CDK application name
CDK_APP_NAME=EksAutoModeApp
# create the CDK application
cdk init app --language=java
# Build application to make sure that setup is working
mvn clean package
cdk synth
Create the implementation of the src/main/java/com/myorg/EksAutoModeStack.java class. The content of the file below includes comments for the most important parts of the code:
publicEksAutoModeStack(final Construct scope, final String id, final StackProps props) { super(scope, id, props);
// 2. Create VPC for an Amazon EKS cluster: varvpc= Vpc.Builder.create(this, "EKSAutoModeVPC") .maxAzs(2) // Use 2 Availability Zone .subnetConfiguration(Arrays.asList( SubnetConfiguration.builder() .name("Public") .subnetType(SubnetType.PUBLIC) .cidrMask(24) .build(), SubnetConfiguration.builder() .name("Private") .subnetType(SubnetType.PRIVATE_WITH_EGRESS) .cidrMask(24) .build() )) // Use 1 NAT Gateway to save cost - don't use in production! .natGateways(1) .build();
// 3. Add tags to VPC subnets to enable Load Balancers for (ISubnet subnet : vpc.getPublicSubnets()) { Tags.of(subnet).add("kubernetes.io/role/elb", "1"); } for (ISubnet subnet : vpc.getPrivateSubnets()) { Tags.of(subnet).add("kubernetes.io/role/internal-elb", "1"); }
// 4. Create IAM Role for an EKS cluster to allow resource management // https://docs.aws.amazon.com/eks/latest/userguide/auto-cluster-iam-role.html varclusterRole= Role.Builder.create(this, "EKSAutoModeClusterRole") .assumedBy(newServicePrincipal("eks.amazonaws.com")) .managedPolicies(Arrays.asList( ManagedPolicy.fromAwsManagedPolicyName("AmazonEKSClusterPolicy"), ManagedPolicy.fromAwsManagedPolicyName("AmazonEKSComputePolicy"), ManagedPolicy.fromAwsManagedPolicyName("AmazonEKSBlockStoragePolicy"), ManagedPolicy.fromAwsManagedPolicyName("AmazonEKSLoadBalancingPolicy"), ManagedPolicy.fromAwsManagedPolicyName("AmazonEKSNetworkingPolicy") )) .build(); clusterRole.getAssumeRolePolicy().addStatements( PolicyStatement.Builder.create() .effect(Effect.ALLOW) .principals(Collections.singletonList( newServicePrincipal("eks.amazonaws.com") )) .actions(Arrays.asList( "sts:AssumeRole", "sts:TagSession" )) .build() );
// 6. Create an EKS cluster varcluster= CfnCluster.Builder.create(this, "EKSAutoModeCluster") .version("1.31") // Enable EKS Auto Mode .computeConfig(ComputeConfigProperty.builder() .enabled(true) .nodePools(Arrays.asList("system", "general-purpose")) .nodeRoleArn(nodeRole.getRoleArn()) .build()) // Enable the load balancing capability on EKS Auto Mode .kubernetesNetworkConfig(KubernetesNetworkConfigProperty.builder() .elasticLoadBalancing(ElasticLoadBalancingProperty.builder() .enabled(true) .build()) .ipFamily("ipv4") .build()) // !!! for EKS Auto Mode we need to enable computeConfig + elasticLoadBalancing + storageConfig .storageConfig(StorageConfigProperty.builder() .blockStorage(BlockStorageProperty.builder() .enabled(true) .build()) .build()) // Deploy cluster nodes in Private subnets .resourcesVpcConfig(ResourcesVpcConfigProperty.builder() .subnetIds(vpc.selectSubnets(SubnetSelection.builder() .subnetType(SubnetType.PRIVATE_WITH_EGRESS) .build()).getSubnetIds()) .endpointPrivateAccess(true) .endpointPublicAccess(true) .build()) .roleArn(clusterRole.getRoleArn()) // Use API mode for cluster access .accessConfig(AccessConfigProperty.builder() .authenticationMode("API") .bootstrapClusterCreatorAdminPermissions(false) .build()) .logging(LoggingProperty.builder() .clusterLogging(ClusterLoggingProperty.builder() .enabledTypes(List.of( LoggingTypeConfigProperty.builder().type("api").build(), LoggingTypeConfigProperty.builder().type("audit").build(), LoggingTypeConfigProperty.builder().type("authenticator").build(), LoggingTypeConfigProperty.builder().type("controllerManager").build(), LoggingTypeConfigProperty.builder().type("scheduler").build() )).build()) .build()) .upgradePolicy(UpgradePolicyProperty.builder() .supportType("STANDARD") .build()) .build(); // Generate unique name for a cluster Names.uniqueId(cluster);
varaccountId=this.getAccount(); // Add access to your AIM Role to the EKS cluster CfnAccessEntry.Builder.create(this, "EKSAutoModeClusterRoleAccessEntry") .clusterName(cluster.getRef()) // !!! replace with your role name/arn: .principalArn("arn:aws:iam::" + accountId + ":role/Admin") .accessPolicies(List.of(AccessPolicyProperty.builder() .accessScope(AccessScopeProperty.builder() .type("cluster") .build()) .policyArn("arn:aws:eks::aws:cluster-access-policy/AmazonEKSClusterAdminPolicy") .build())) .build();
If you have problems accessing the EKS cluster, you can go to EKS cluster console and add your role to “Access/IAM access entries” with “AmazonEKSClusterAdminPolicy”
Get the EKS cluster nodes:
1
2
kubectl get nodes eks-node-viewer
You should receive “No resources found”
Deploy a sample load balancer workload to the EKS Auto Mode cluster using this instructions or the code snippet below:
Check that all resources have deployed properly. It might take 3-5 minutes to deploy the Application Load Balancer (ALB):
1 2 3 4 5 6 7 8 9 10 11 12 13 14 15 16
kubectl get nodes -o wide # NAME STATUS ROLES AGE VERSION INTERNAL-IP EXTERNAL-IP OS-IMAGE KERNEL-VERSION CONTAINER-RUNTIME # i-04602f286ba355450 Ready <none> 28m v1.31.1-eks-1b3e656 10.0.3.172 <none> Bottlerocket (EKS Auto) 2024.12.8 (aws-k8s-1.31) 6.1.115 containerd://1.7.22+bottlerocket kubectl get pods -n game-2048 # NAME READY STATUS RESTARTS AGE # deployment-2048-98ddb8c75-55qcx 1/1 Running 0 29m # deployment-2048-98ddb8c75-5szlq 1/1 Running 0 29m # deployment-2048-98ddb8c75-8drv4 1/1 Running 0 29m # deployment-2048-98ddb8c75-l6q89 1/1 Running 0 29m # deployment-2048-98ddb8c75-qtvs5 1/1 Running 0 29m kubectl get svc -n game-2048 # NAME TYPE CLUSTER-IP EXTERNAL-IP PORT(S) AGE # service-2048 NodePort 172.20.151.169 <none> 80:31472/TCP 29m kubectl get ingress -n game-2048 # NAME CLASS HOSTS ADDRESS PORTS AGE # ingress-2048 alb * k8s-game2048-ingress2-2f6e07220b-1922490733.eu-central-1.elb.amazonaws.com 80 29m
1
2
URL=$(kubectl get ingress -n game-2048 -o jsonpath='{.items[0].status.loadBalancer.ingress[0].hostname}')
echo http://$URL
Now you have an up and running EKS cluster and can play the game using the ALB address above. You can also scale the number of replicas in the deployment to 10 and back to zero to see how EKS cluster nodes are created and destroyed.
Destroy the deployed stacks. Review the changes proposed by CDK, and say “yes” to the CDK question:
1
cdk destroy
Conclusion
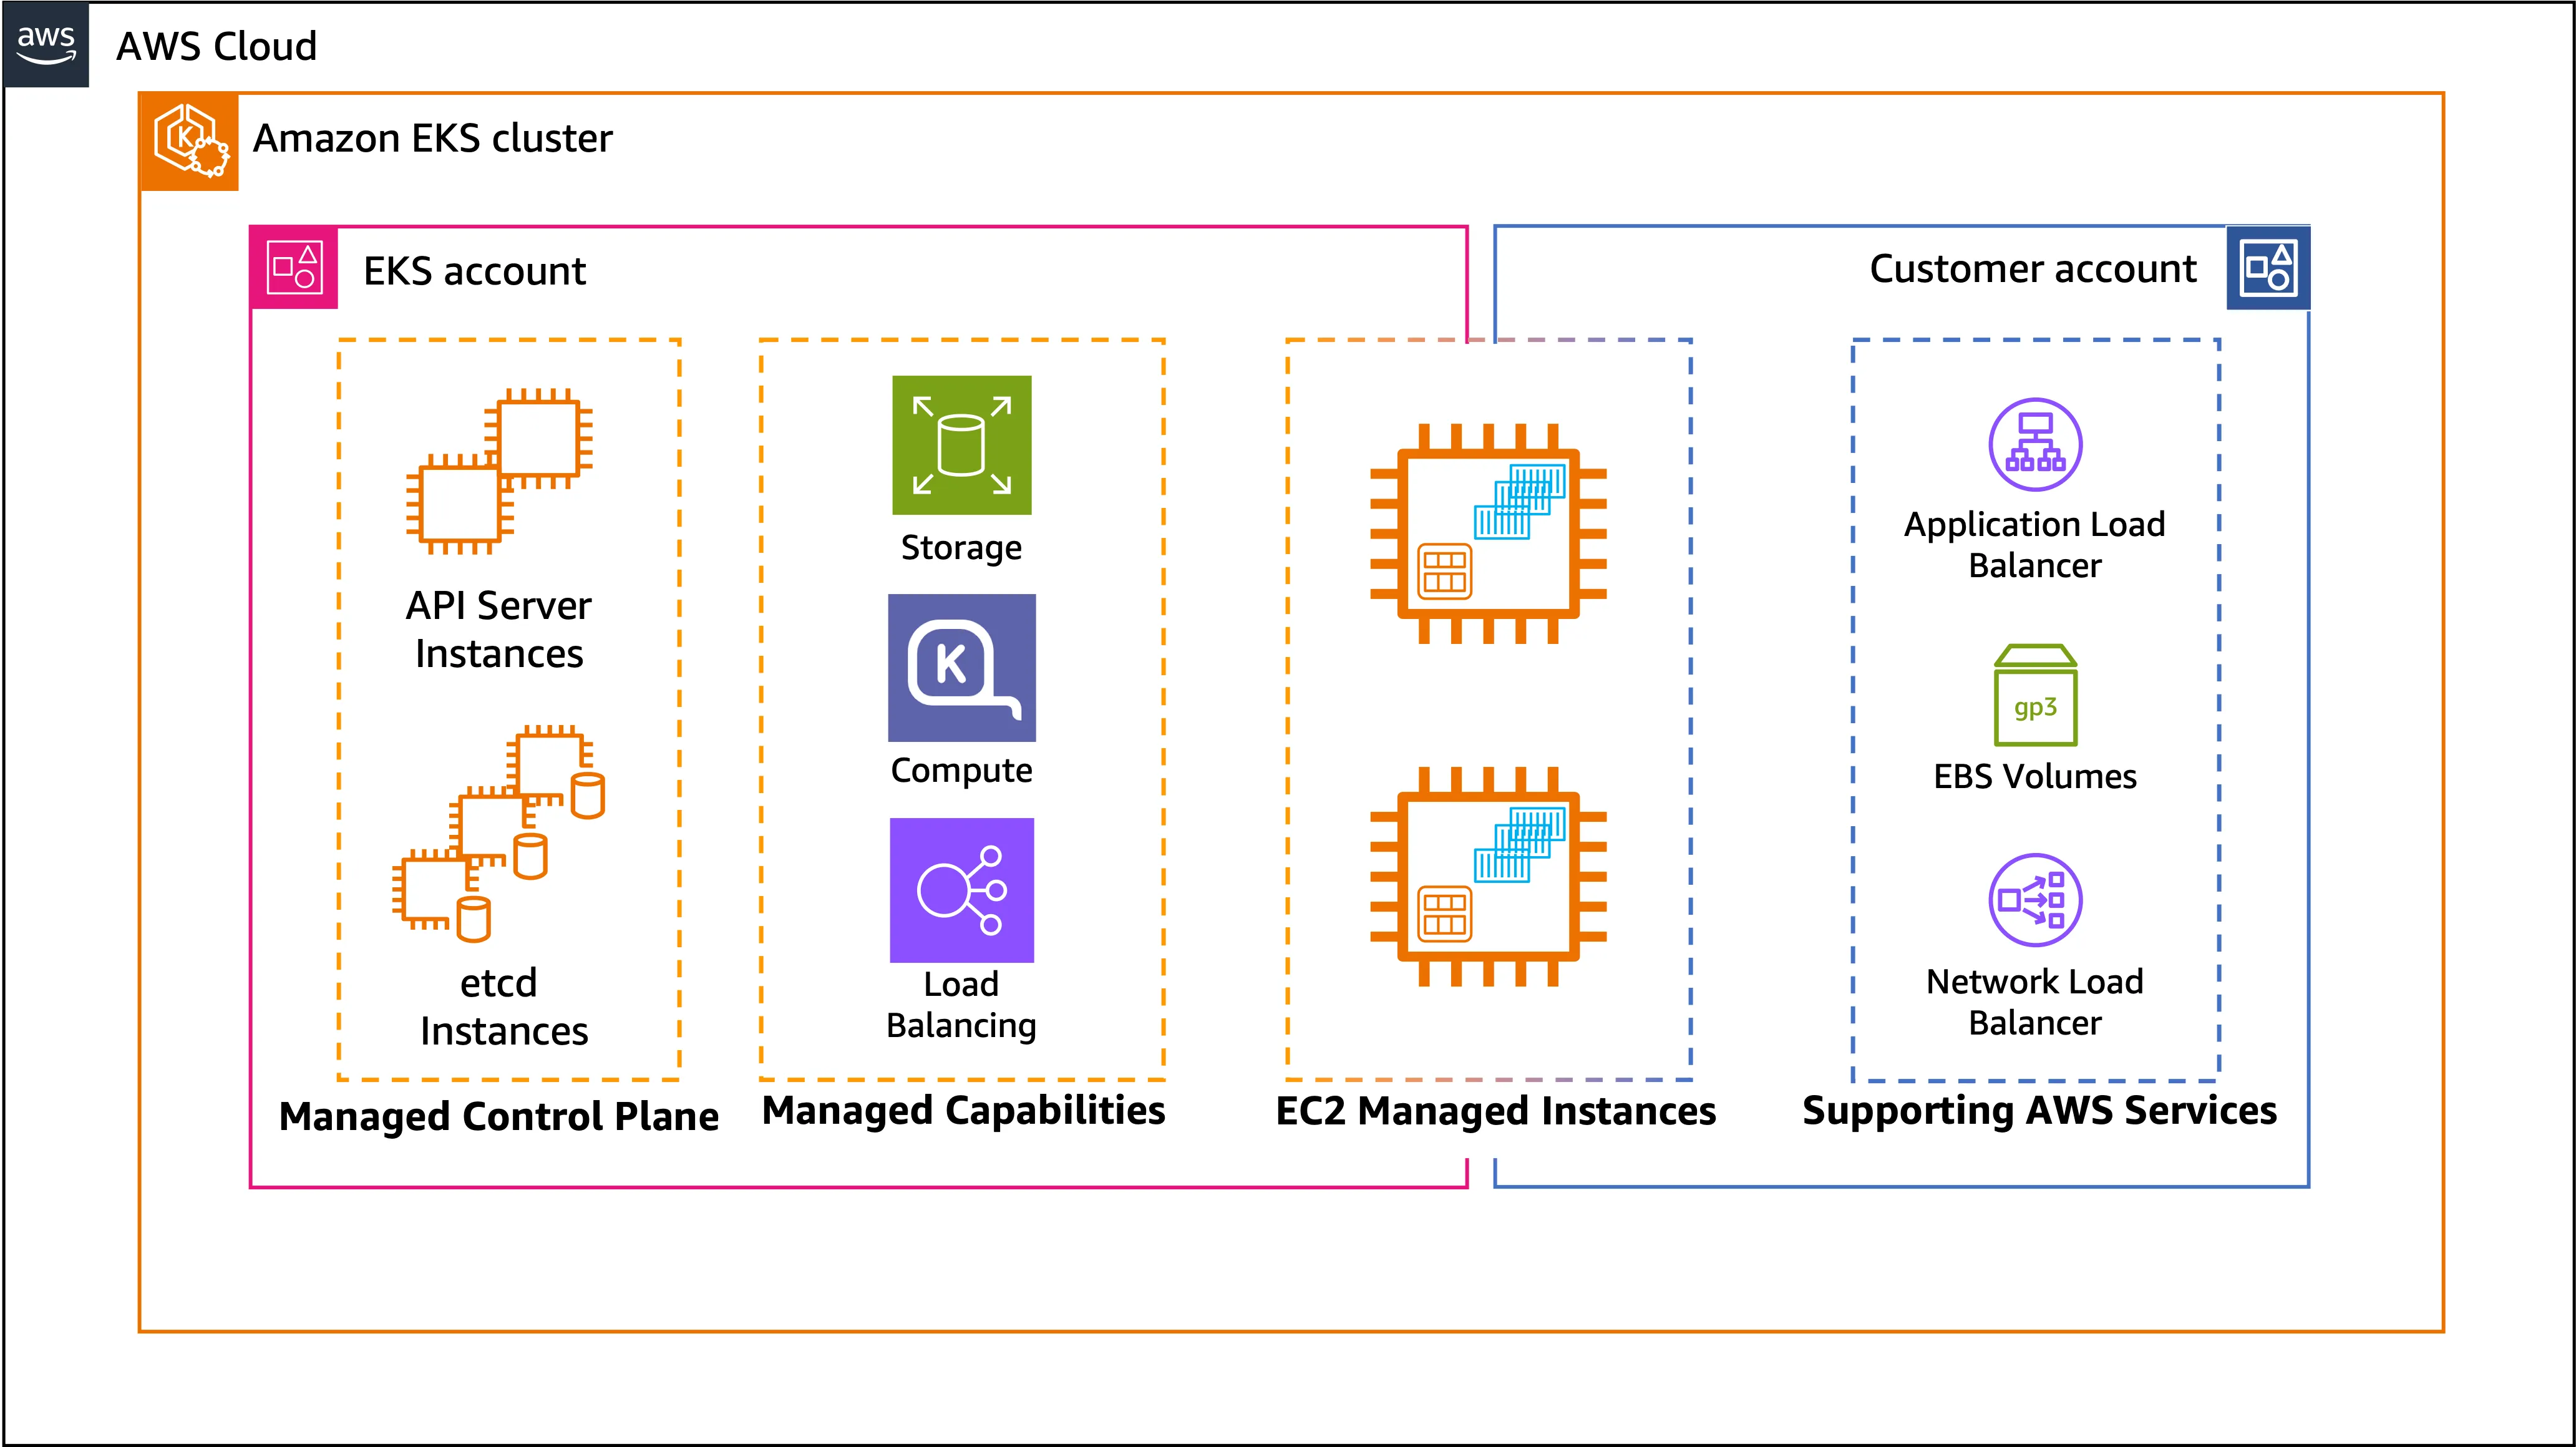
In this blog post, I demonstrated how to deploy an Amazon EKS cluster in Auto Mode using AWS CDK with Java. This setup not only gives you the ability to automate EKS cluster deployment, but also delivers a ready-to-use EKS cluster with:
Managed Kubernetes Control Plane
Managed Kubernetes Data Plane with Amazon EKS Auto Node Managed Capabilities including:
Compute with EC2 managed instances deployed by Karpenter